Hummingbird by Birdbrain Technologies

Hummingbird Tutorial

Next week we have a group of teachers coming in to learn some new skills they can integrate into their classes next year. I’ll be teaching a blended session on using the Hummingbird.   It’s a great way to introduce and combine making, robotics, and coding.  Putting the pieces together is pretty simple – no wire stripping, no resisters, no soldering.  The one big drawback is the price of the kit.  But if you take good care of it and keep up with the pieces, it can last a long time.  I made this simple worksheet to guide the teachers through testing out how to connect and code each of the inputs and outputs.  They will have already had a session on coding with Scratch.  After working through this worksheet the teachers will spend the rest of the day creating interactive constructions using the Hummingbird.  

Make sure that you have both offline Scratch and the Hummingbird Server installed on your laptop.  

Go to these websites for self-guided lessons provided by Birdbrain Technologies:

https://www.birdbraintechnologies.com/hummingbird/software/scratch/lessons/#program

http://www.hummingbirdkit.com/learning/introduction-hummingbird-scratch

Watch the two videos at the beginning of pages linked above.  They will explain how to connect the inputs and outputs to the Hummingbird and connect the Hummingbird to the Scratch extension with Hummingbird programming blocks.  When programming the following outputs and inputs, make sure that you are indicating which port you are sending the code to.

Outputs

The Hummingbird LEDs and motors are output devices. By writing programs (scripts) in Scratch you can send commands to these devices to make different things happen.  You might cause a motor to vibrate or turn.  You may cause lights to blink on and off.  You may also turn text into a voice.

Overview of Module 1:  LEDs

Follow the step-by step instructions on one of the websites linked above to attach and program LEDs  (light emitting diodes) using Scratch. Light up several LEDs and change the light intensity. Learn to turn them on and off.  If the LEDs do not light up check your connections. Check your code. Check your power.

Overview of Module 2:  RGB LED

Follow the step-by-step instructions to make the RGB (Red-Green-Blue) LED light up in different colors.  Use this chart to control the colors.

Overview of Module 3: Motors

  • Vibration Motor – The shaft of this tiny motor is weighted more on one side of the shaft than the other.  This causes it to vibrate back and forth when it rotates. Attache a feather or a curly pipecleaner to have some fun.
  • Servo Motor – A servo motor is a motor that moves to a particular angle. The Hummingbird servo motor can rotate to any angle from 0° to 180°.  Consider using this motor mounted at different angles to close a door, wave a sign, or flap a wing.  Use your imagination.  
  • Gear Motors – This motor can make complete 360 degree turns clockwise as well as counter clockwise by using whole numbers between -100 and 100.  How could you include this in your construction?  A Merry-go-round? A revolving planet?

Overview of Module 4: Speak Block

The Speak block converts text to speech. The voice has tht digital sound, but most words can be understood.  In you code, remember to use a Wait block after the Speak block.

Inputs

The Hummingbird sensors are input devices. They collect information from the environment and send the information to the Scratch program where it it used to make a decision or control an output device.  You can create a threshold or a range of date which will trigger a result by using If-Then statements.  For instance, it the level of sound is over a certain threshold, the Speak block may be programmed to say, “It’s too noisy in here,” the Servo motor may raise a sign that says, “Shh!” and the LEDs may light up.  

Overview of Module 5: Distance

  • The distance sensor measures the distance to the closest object  in centimeters. It can detect distance between about 8 cm and 100 cm.
  • The Sound Sensor measures the level of sound on a scale of 1 to 100.
  • The Temperature Sensor detects the temperature in Celsius.

There is also a light sensor and a tilt sensor, but we do not have these in our kit.  

Troubleshooting:

What if the Hummingbird locks up?  https://www.youtube.com/watch?v=feAT6uGvlpA&feature=youtu.be

Categories: 21st Century Skills, Art, Automatons, Circuits, Engineering, Professional Development, Professional Development Tool, Robotics, Scratch, Technology | Leave a comment

More About the KIBO

It seems logical that today’s students should become familiar with the construction and use of robots. After all, even though we can’t predict exactly what the world will be like in the future, we know that robots and humans will increasingly work side-by-side. Factories, farms, hospitals, airports, banks, and grocery stores — just about everywhere physical labor is involved, the workplace our children will enter will look vastly different than our own. This can be a good thing: robots can be built and programmed to perform tasks efficiently and safely, without fatiguing and under adverse conditions, allowing the rest of us to focus on other tasks. Consequently, it seems natural to begin preparing our young people for this future world.  Even if robotics weren’t an inevitable economic force, I think there’s a strong argument that robotics provides an amazing foil to teach children about the softer sides of being a successful adult.  At my school we often ask ourselves, “How can we plan activities in which the children develop the skills and concepts they need while at the same time fostering the development of the socio-emotional competencies needed to function as content, productive adults?”  It may seem unlikely, but I think robotics can be one answer: By setting up the conditions for children to design, build, and program robots in small groups, robotics can provide that magic mix of hands-on work, social interaction, and brain work. These three elements go a long way toward developing confidence, competence, social skills, and a sense of agency.

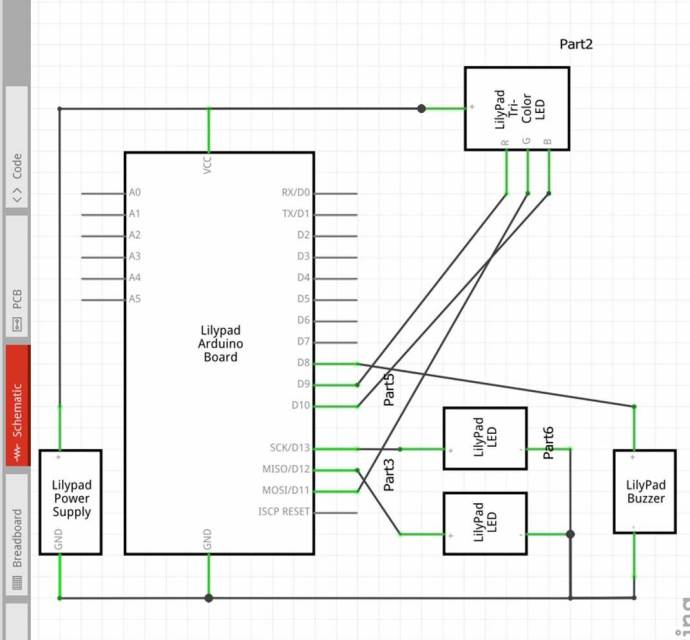
I use KIBOs to give my students the opportunity to practice risk-taking, creativity, engineering, and computational thinking skills. The KIBO is designed so that users can see and work “under the hood.” Unlike many forms of technology we use in our daily lives, students can actually see the circuit board and the power supply inside it, take it completely apart, and rebuild it in multiple configurations.  As they construct and program with the KIBO kits, they are placed in a situation where they must make plans and decisions, test and debug, bump up against frustration and figure out what to do next. They are developing confidence, resilience, and a sense of agency with every step of the process.  

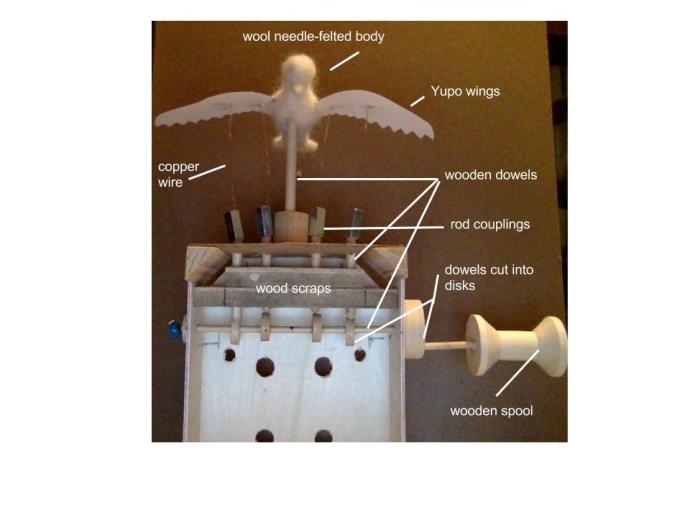
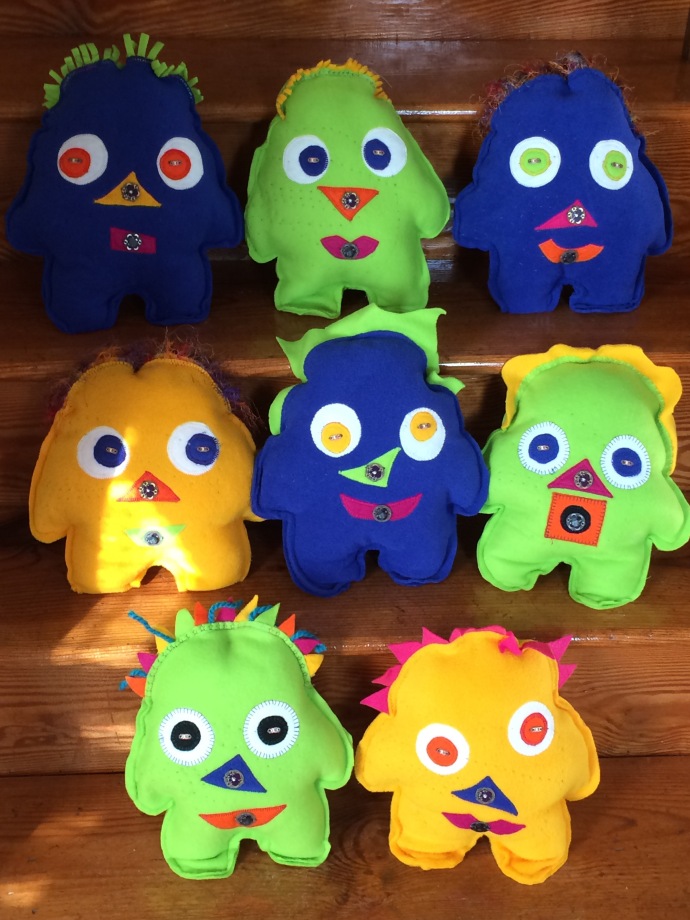
The KIBO’s input modules (the sound, light, and distance sensors) and output modules (sounds and recordings, lights, and motors) help students develop an understanding of how we program robots to interact with our world. There are several different kinds of platforms that can be added to the top of the KIBO, each allowing students to customize their robot with their own construction of craft materials or LEGOs.  Adding a customized platform involves exercising some engineering skills to design, construct, and attach it.  I’ve observed that using the platforms often increases the students’ investment in “making the robot work.”  Suddenly, the KIBO goes from being an “it” to having a name and a persona.

The command blocks allow students to program movements, sounds, and lights using simple sequences of commands, repeat loops, and if-then statements. This promotes an understanding of some of the fundamental concepts used in computer programming.  Programs are “written” with wooden blocks that are “read” by the KIBO through a scanner, eliminating the need for a tablet, laptop, or account of any kind.  This means even the youngest learners can be both engineers and programmers. They start to develop an understanding of how robots are constructed, how their inputs, outputs, and appearance can be customized, and how they can be programmed to behave in a certain way or perform a task.  This is very empowering.

Working and playing with KIBOs in small groups fosters valuable social skills such as explaining thoughts and feelings to others, listening carefully, sharing materials, and respecting and supporting each other’s ideas. Goodness knows, we need more of that in today’s world.  Constructing a KIBO, building a customized top, and programming it to do what you want involves planning, risk-taking, problem-solving, iterating, and perhaps most importantly, persistence.  In my classroom we talk openly about being frustrated and the strategies we can use to overcome it so we can keep moving forward. The kids always laugh when I ask them to show me their frustrated face. Then I ask them to show me their resilience muscle.

One of my favorite lessons is the introduction of the KIBO to our Junior Kindergarten.  We read the book, Boy and Bot, by Ame Dyckman, and then we talk about the differences between real people and robots.  I show them just the body of the KIBO and they are excited to see the circuit board and batteries inside. They notice the power switch and the ports where different modules can be attached. I don’t show them a built KIBO or tell them how to put it together.  Instead, I give each group of children a box with a KIBO body, motors, wheels, and a light and I tell them that this is a box of parts to build a robot.  As the children work together to figure out how to build it, there are lots of conversations about the possibilities, lots of negotiations, and lots of risk-taking going on.  Inevitably, within fifteen minutes, we have a classroom full of working robots.  They are all slightly different in construction and performance, but they are all moving across the floor in one way or another.  This lesson is followed by a series of meetings during which the students iterate the construction of their robots and work with the coding blocks to program them to move, sing, light up, and respond to input. But I love this first lesson because it imparts to the children that we have confidence in their capacity as designers and engineers.  

Children need to actually touch, manipulate, and experiment with objects in order to fully understand them. Robots bring this physical interaction to the potentially intimidating process of understanding engineering and programming. When paired with the social interaction of working with friends, we can deepen the understanding through conversation and idea sharing.  The bonus is that, while the children are learning about engineering, robotics, and coding, they are practicing their ability to communicate and collaborate. I think they love that, for much of this process, they are in control.  We have acknowledged our belief that they are capable engineers and programmers.

In our children’s future careers, the way they work, interact, and communicate will continue to evolve as it has during the lifetime of today’s adults.  The products and services our children will design, build or sell will also evolve. New and exciting opportunities will exist for them. Many jobs will involve the design, construction, programming, and maintenance of automated tools, including robots.  You don’t have to look too far to see prototypes already in development or in use: self-driven cars (Uber), home robotic companions and workers (Roomba, Pepper, Paro, and Jibo), and smart home hubs (Echo, Dot, and Google Home) to name just a few.

These new tools will be programmed with algorithms that enable them to “learn” and adapt to input (artificial intelligence). We already see this when we use services like Netflix and Goodreads: when we finish one video or book, they suggest what we might enjoy next based on our history and our ratings. I think it’s important that our children have at least a basic understanding of how these technologies work.  They may have jobs designing these tools or deciding how they will look or how we will interface with them. More importantly, I would hope our students would have a well-polished moral compass to guide them in how these tools play a part in our lives and the choices we make when building and using them.  This is why the social-emotional piece is so important.  As we become more adept at building and programing machines to do our work, it becomes essential for someone to be making the ethical decisions about what these machines can do, how they will do it, and who will have access to them.

As with anything that we think is important, we start exposing children to the foundational skills and concepts when they are very young. The terms become part of their vocabulary, and if we are skillful in teaching the concepts in an age-appropriate way, the concepts become part of their general fund of knowledge. I use a lot of stories to explain the concepts of algorithms, repeats, events, functions, and conditionals to my students. They all come straight from real life so the children can relate to them. These concepts may sound foreign, but when you start to draw connections with real-life events, they become normalized and easier to understand. They are something the children can use when planning any task or event, from writing a book report to planning a playdate with a friend. I love it when a student asks me if I want to hear their algorithm for a task we don’t usually associate with computer programming.  

Saying “Coding and robotics are for ‘big kids’” is like saying “Reading is for “big kids.”  If we wait until a child is in middle school to hand them a book, we have not only devalued reading, we’ve also missed out on the opportunity to make it easy and fun.  Beginning in Junior Kindergarten, all of our students work with robots and coding in some way.  It’s not just for gifted students or older students – it’s for all students.  By the time they finish fifth grade they have programmed several different kinds of robots to accomplish tasks such as navigating mazes, carrying cargo to specific destinations, and making decisions about when to move, light up, and make sounds and when to be still.  Given the appropriate tools and the right introduction, you just need to step back and watch the magic happen.  


Categories: Robotics, Social-Emotional, Technology | Leave a comment

Using the KIBO Robot to Tell Greek Myths

Last spring I worked with a group of teachers and second grade students to retell Greek myths with robots designed by Kinderlab Robotics.  I can’t say enough about the ingenious KIBO robots.  So much thought went into their design.  They provide very young children the opportunity to practice STEAM skills as they develop social-emotional competencies.

Working in groups required the children to listen to each other; make decisions as a group; combine their ideas and skills to write their myth script, design and create their god or goddess and their map, and construct and program the KIBO.  On the final day of the project, students gathered around each story map as the authors ran their KIBO programs and read the accompanying scripts. When everyone was finished, we then allowed time to debrief the whole process, reflecting on the challenges they faced and the strategies they developed to overcome these challenges. To our surprise, almost every group focused on the social-emotional challenges this project presented. They pointed out how important it is to give each member of the group time to express their ideas and their frustrations and to acknowledge in a respectful way that each person is heard and their thoughts are valued. They talked about their strategies for collaborating on story writing, robot construction, map drawing, and how to program the KIBO. They also talked about how to deal with group members whose behaviors they found frustrating.

Read more about it and see the pictures in my article on the KinderLab Robotics website.

Categories: 21st Century Skills, Engineering, Robotics, Technology | Leave a comment

Button Joy

Button Joy launches today!!!  It’s a super cool product that uses Cloudstitch to drive it. Since it’s customizable, I am excited to see the creative ways people will choose to use it.

Here’s an example of how it works: Operation Dad Pager

Step 1: Order a Button

Order a button and choose what you want to happen when you push it. You can change these actions from our website later!

Step 2: One Minute Setup

When the button arrives, connect it to your local WiFi network.

Step 3: Push the Button

Each time you push, we’ll perform the action you’ve configured. For charitable contributions, we confirm over SMS before charging your card.

If you get one, please comment here to let me know what you did with it.

Categories: 21st Century Skills, Innovation, Technology | Leave a comment

Little Pig’s Safe House

Three Pigs Safe Room

I decided to make a safe room for the three little pigs.  When the wolf finally figures out how to blow down the brick house, they need somewhere to go.  This room is under the brick house and it is totally secure.  I started with a leftover Starbucks gift box, scraps of colored paper and cardboard, glue, copper tape, Chibi lights, a coin cell battery, Sharpee pen, and duct tape.  I also printed a tiny pig portrait from the Internet.

saferoom-material

First I mounted the Chibi lights on the back wall of the room.  Chibis are tiny LED stickers.  Each one has a positive and negative side. When place on a copper tape circuit they will light up.  

 saferoom-lights

Next I created a a switch for the lights on the outside of the box using red duct tape.

saferoom-switch

Finally I constructed the furniture, the refrigerator, the books, and the locked door with the scraps of paper.  Instead of working with patterns, I decided I was going to make myself go through the mental gymnastics of trying to figure out how to construct each piece of furniture in the room by cutting, folding, and gluing the paper.  

When the glue on them had dried, I glued them into the room.

img_5421

I didn’t face any big challenges.  After I gathered the materials, it all seemed to come together pretty easily.  


Thinking about how to construct each piece of furniture was really the only challenge.  I didn’t want the furniture to be made out of separate pieces of paper so I tried to cut each one into one piece of paper when was then folded and glued in sort of an origami fashion to create the final piece.  It was kind of like solving a puzzle.  I think my experience with dismantling cardboard packaging to save the cardboard helped a lot.  

Categories: Art, Circuits, Engineering, Technology | Leave a comment

Left Over Larry

I am going to call my project Larry Leftovers because I made it out of leftovers from other projects.  I started with an empty crayon box, a tuft of orange wool, a red pom-pom, two blue LEDs, two 2023 coin cell batteries, and a battery holder with an on-off switch.  I used a glue gun, needle nose pliers, hole punch, and tape.  The parts were in different places in my house (sewing room, garage, and kitchen.  I gathered everything together on the kitchen table and completed it in about twenty minutes. After gathering everything, I didn’t have to get up to find something.  But this involved planning.  In the classroom, I think all teachers do this when they plan a project – they think ahead about what materials to have available so they won’t have to go get something after the kids get started.  The kitchen table is one of my favorite places to work because it is well lit by a big bay window and I can listen to music while I work.  At school I have good lighting (unfortunately no windows) but no music.  Hmmm, should I get a little radio?  

larry-parts

I used a couple of tricks I like with the LEDs.  First, I use a black Sharpee to mark the negative lead so that when I bend it, I can still identify it.  Then I take the needle nose pliers to pinch each lead and wrap it into an “eye” so that I can thread wires through them.  This eliminates the need to solder – an advantage when working with little kids.

larry-led

I put the coin cell batteries in the battery holder and attached the wires to the positive and negative leads of the LEDs.

larry-eyes

 I used a hole punch to punch holes in the crayon box and drew eyes and mouth on the box.  I glued the orange fleece on the inside of the box using the hot glue and reinforced it with tape.

larry-hair

I glued the red pom-pom on the front of the box and voila, Larry Leftovers!

leftover-larry


Categories: Circuits, Engineering, Technology | Leave a comment

Lego Pen Holder

This project started when my friend and colleague, Shahwar,  sent me a link to an article on The Tinkering Studio’s blog, Sketchpad.  We had been talking about ways to expand our lower school robotics program and she wondered if we could print some pen holders to attach to our EV3s.  The article explains the iterations the Tinkering Studio staff went through to create an adjustable pen holder to attach to a Lego brick.  It could be used on builds with the WeDo hub or the EV3 motor.  

I downloaded the file for the Set Screw Version of the pen holder from Thingiverse and loaded it to the Up printer we use in the lower School Lab.  They printed perfectly.  Next came the step of cutting the threads, or tapping, the hole for the tightening screw.  This will allow users to use any drawing tool that is the same size or smaller than a Crayola marker.  My husband, Russ, never fails to have just the right tool.  He found the ¼” tap and tap handle and we easily drilled the threads into the 3D printed pen holders.  
Next step: Challenge my students to attach the pens and program the EV3s to draw geometric shapes on large sheets of paper taped to the floor.

img_5437

Categories: 3D Printing, Art, Engineering, Robotics, Technology | Leave a comment

Rapunzel’s Bird

Rapunzel’s Bird

As an assignment for a class I am taking on early childhood technology and makerspaces, I had to design and create a solution to a problem for a fairy tale character.  This assignment gave me an opportunity to tackle a project I’ve been thinking about for a while.  Two of my favorite artists are Arthur Ganson and Paul Spooner.  Their work was the inspiration for this design.

Arthur Ganson’s work can be seen at the MIT Museum on Massachusetts Avenue in Cambridge and I was lucky enough to see an exhibit of Paul Spooner’s work (as well as other automaton artists) at the Exploratorium in San Francisco this December.  Here are some videos of them talking about their work.  Prepare to smile.

Arthur Ganson  https://www.ted.com/talks/arthur_ganson_makes_moving_sculpture

MIT Museum https://www.youtube.com/watch?v=5qeaP6LmS64

Paul Spooner at Exploratorium https://www.youtube.com/watch?v=Gi1R5qty660

https://www.youtube.com/watch?v=J3QEY0yW4Fw

Over Christmas break I read a book called Cabaret Mechanical Movement (PDF) by Gary Alexander and Aidan Lawrence Onn.  The book was invaluable in helping me understand how the mechanisms of simple machines work.

My idea is a magical flying bird owned by Rapunzel.  It swoops down to the window of the tower to visit her everyday.  Finally she climbs on its back and carries her away to her true love.  Honestly, I couldn’t care less about Rapunzel, but I really enjoyed this challenge.

I started with an empty Clementine box, three different sized dowel rods, a wooden spool, a few scraps of wood, a few screws, a sheet of Yupo, some thin copper wire, rod couplings, E6000, Tacky Glue, and some white wool fleece.

bird-materials

The tools I used were a framing saw, a hand drill with different bits, hole saw (for drilling doorknob holes), needlenose pliers, scissors, ruler, and a needle-felting tool.  

Before starting out, I drew a sketch of how I thought it would all go together.  This was very helpful, even though I made several changes along the way.

bird-sketch

I cut five little disks of wood off the end of the larger dowel rod and sanded them flat.  Then I drilled off-center holes in four of them.  These are the cams.  I drilled a center hole in the last one to act as a bearing for the axle.  I drilled holes in the sides of the Clementine box and slid the smaller dowel rod through it to create the axle.  The cams went onto the axle before the end of the dowel exited the other side of the box.  

cams

I drilled a tiny hole in one of the axle and threaded a piece of copper wire through it to keep the axle from slipping back through.  I secured this with a ceramic bead.

bead-holder

I used a hole saw to cut a ¾” thick disk of plywood to support the crank that would turn the axle.  I drilled a hole in the center of this for the end of the axle and an off-center hole for the crank.  I glued a bit of dowel rod into the off-center hole and pull the wooden spool on it for the handle of the crank.

crank-handle

I spaced out the cams and glued them in place on the axle.  Then I drilled holes down through the top of the Clementine box lined up with where the cams were.  I cut four 3” pieces of the small dowel rod to fit into each of the holes and act as followers (they follow the shape of the cam as it turns).  They slid up and down easily in the holes, but I found that they would slip off one side of a cam and get stuck instead of riding smoothly around the perimeter of the cam.  First I tried sanding the dowel pieces so the ends were rounded instead of cut off bluntly.  This helped a bit, but I found that when I turned the crank, the followers were very wobbly, so I drilled holes in two pieces of scrap wood and glued them to the inside of the Clementine box to act as bearings.  This made the cams move only up and down instead of side-to-side as well.  

cams-followers

I needle-felted the bird’s body, slit a hole in its belly, and mounted it on a six” piece of dowel rod.  I took a short piece of the larger dowel and drilled a hole in it to support the little dowel.  Then I glued it on top of the box.

I cut the wings out of notebook paper to try to get the size and shape the way I wanted it before cutting the Yupo.  I ended up making several different notebook paper wings before I was satisfied with their size in proportion to the bird’s body. Then I used the notebook paper template to cut the Yupo.

side-bird

I drilled a tiny hole in the top of each of the followers and glued in a piece of thin copper wire. I had to test several different times to get the placement and length of the support wires correct on the wings.  But something was still wrong.  When I turned the crank, the wings would go up on the followers, but they would not come back down.  After contemplating several solutions, I decided that gravity could help with the problem.  I went to Lowes and bought four 1” rod couplings.  I detached the wires from the wings and slid the couplings over them, then reattached the wings.  The couplings added just enough weight to pull the wings down after each turn.  

adding-weight-to-followersThe pictures and video below show the finished project.  My work on this ranged from the kitchen to the garage and back several times.  I had all the materials I needed close at hand, but only after first gathering them.  I didn’t anticipate the problem with the wings so that involved a trip to Lowes for the rod couplings.  

bird-automataWorking through this involved testing and re-adjusting at every stage.  Did the followers align with the cams? Did the axle turn the cams smoothly?   Why didn’t the followers drop after going up?  Were the wings simulating flapping of just moving around randomly?  I had to deal with issues of motion, torque, balance, friction, scale, and gravity as well as a few more I probably can’t even name.  Luckily I did not have to define any of them or solve any equations on paper because I could not do any of that.  I just messed around until it worked.  

Video  https://youtu.be/kshkSg40jfo


Categories: Art, Automatons, Engineering | Leave a comment

Little Bees Automaton

This was my first attempt at making an automaton.  I chose to use wire to create a shaft, handle crank, and driving cranks.  The wire I used is very stiff tie wire used to connect rebar. The stiffness is good because it does not lose its shape, but it makes it hard to bend. I used a little cardboard box as the frame.

img_5324 

The followers were also made out of the wire.  I realized right away that the followers were slipping on the crank and would need to be stabilized.  I wrapped a thinner copper wire around the crank on each side of the areas where the followers were attached.  Then I tried to solder them to the tie wire, but it would not bond.  However the solder did stick to the copper and created enough of a block to keep the followers from slipping.  

img_5328

I added ceramic bearings on each side of the shaft and a ceramic bead to the crank handle.  

img_5327

My first figure was a cardboard man with jointed limbs.  When I turned the crank, he jiggled himself apart.  Disappointed, I put the automaton aside and got busy with some other things.  As often happens when I walk away from a project and let my mind rest, I got a new idea – needle felting.  I am much more comfortable with fibers than I am with cardboard.  

Two little needle felted bees would be just perfect for this project.  I needle felted two little yellow oval shapes.  Then I took a few strands of black yarn and added stripes and eyes.  I cut tiny white wings out of white felt and felted them onto the bee bodies.

img_5325

I used an awl and a little pair of shears to cut a slit in the bottom of each bee and stuck them on the top of the followers.

img_5326

A needle felted flower completed the project.  When the crank is turned the bees flutter over the flower.  Here is a video of the bees in action.


Categories: Art, Automatons, Engineering | Leave a comment

Lily Pad Arduino Doll Fleet

These dolls were created to introduce students to coding in Arduino.  Their construction in similar to the Arduino Ugly Doll (see earlier post for details on this doll), but their components are slightly different.  Each one has two white LEDs sewn onto the eyes, one RGB LED sewn onto the nose, and a piezo sewn onto the mouth.  They each have a LilyPad Arduino and a battery holder sewn onto the back.  

I made a pattern out of scrap paper and cut the bodies and face parts out of different colored fleece.

img_2546

Next I sewed all the facial features onto the front piece of each doll.  Then I sewed the back piece to one side of the doll so that the doll could open like a book.

img_4738

The LilyPads, battery holders, LEDs and piezos were sewn on by hand using conductive thread.  Below you see the faces.

img_5314

This picture shows the circuitry created with conductive thread.  The LEDs and the piezo are each attached to different pins on the LilyPad Arduino.  A piece of fleece was sewn between two crossed threads and on top of the circuitry on the back of each doll to prevent short circuits.

img_5318

Here is my hand-drawn circuit map.

img_5323

These two diagrams of the circuitry were created by my friend, Tom Gallo, using a program called Fritzing.

circuitry-1

circuitry-2

The seam around the doll was completed and the dolls were stuffed with polyfill.  Here are the eight dolls lined up and ready to go to school.  

img_5322

The students will write code in Arduino to control the blinking of the LED eyes, the blinking and color of the RGB nose, and the melodies and tones played by the piezo mouth.

Categories: Arduino, Circuits, eTextiles, Technology | Leave a comment

Create a free website or blog at WordPress.com.